This chapter contains the following topics:
Viewing Job and Cost Information
Costs by Vendor/Employee/Customer
You can use this selection to get a rapid look at many aspects of the jobs you have on file, as well as cost categories in Cost Categories and the G/L accounts you have entered into Valid G/L Accounts.
There are five separate inquiries available with this selection. They are described below.
When you view jobs, costs by job, or costs by vendor/employee/customer, then everything you see is either in the active files or the inactive files depending on which mode you are currently in.
| • | Refer to the Using Job Cost chapter for instructions on switching from one mode to the other. |
| • | You cannot view on the same screen information from both the active and the inactive files. |
| • | When using the active files, you cannot view cost items saved to Detail Holdings. Use the View saved detail selection for this purpose (described in the Utility chapter). |
When you view cost categories or valid G/L accounts, it makes no difference which mode you are in.
Select
View from the J/C menu and then select the desired function.
With View \ Jobs, you can look at:
| • | All of the jobs you have on file |
| • | The cost items on file for each job |
| • | A summary of the costs, billings, and payments already accumulated for each job |
| • | Any additional descriptions you may have entered for the job or its sub-jobs, change orders, or cost items. |
Enter the following information:
Starting job number
Options
Enter the number of the first job in the range you wish to view, or use the option:
|
<F2> |
For the first sixteen jobs on file |
|
Format |
7 characters |
|
Example |
Press <F2> |
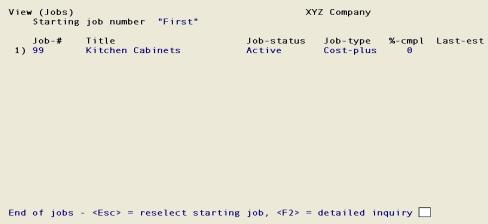
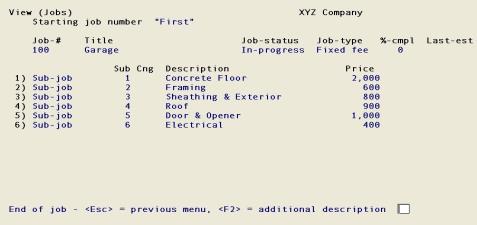
The following screen displays:
Jobs are displayed regardless of their status (even if they haven’t been activated yet).
Options
You can scan through all jobs, or request detailed information about any job displayed. The available options are:
|
<F1> |
For the next 16 jobs (if present) |
|
<F2> |
To select one of the jobs shown on the screen |
|
<Esc> |
To go back and specify another starting job |
|
Format |
[Only option key input is accepted here.] |
|
Example |
Press <F2> to select a job |
Line number
This field displays only if you have pressed <F2>.
Enter the line number corresponding to the desired job. This is not the job number, but the number that displays on the screen to the left of the job number.
|
Format |
99 |
|
Example |
Type 1 |
The job you selected for more detail is redisplayed at the top of the screen and a second menu displays as follows:
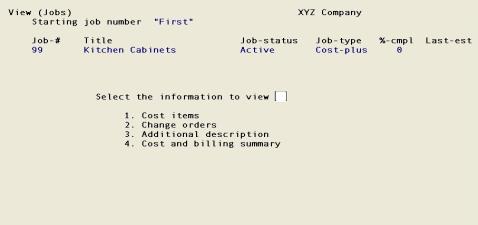
Use this menu to select cost items, sub-jobs and change orders, additional description, or cost and billing summary.
|
Note |
If this job does not use sub-jobs, and you are not using change orders, the menu selection 2. Sub-jobs and change orders will not appear, and the remaining selections will be renumbered accordingly. If this job does not have any additional description, the menu selection 3. Additional description displays anyway. |
Jobs: Cost items
Select
Cost items from the second Jobs screen above.
Enter the following information:
Enter starting cost item
Options
Enter the starting number of the range of cost items you wish to look at for this job, or use the option:
|
<F2> |
For the next eleven cost items on file for the job |
|
Format |
9999999 (for cost category) 999 (for sub-job, if any) 999 (for change order, if any) |
|
Example |
Press <F2> |
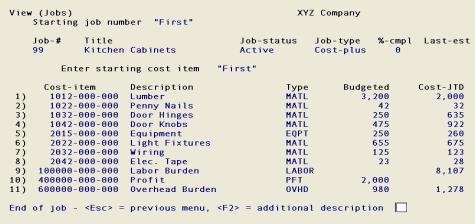
The following screen displays:
Options
If the cost item you are looking for is not on the screen, press <Esc> to go back and re-specify the starting cost item number, or use one of the options:
|
<F1> |
For the next 11 cost items for the job, if present |
|
<F2> |
To display any additional description for any cost item that is on the screen |
|
Format |
[Only option key input is accepted here.] |
|
Example |
Press <F2> to display additional description |
Line number
This field displays only if you have pressed <F2>.
Enter the line number corresponding to the desired cost item. This is not the cost item number itself, but the number that displays to its left on the screen.
|
Format |
99 |
|
Example |
Type 2 |
If the cost item possesses additional description, it will be displayed as follows:
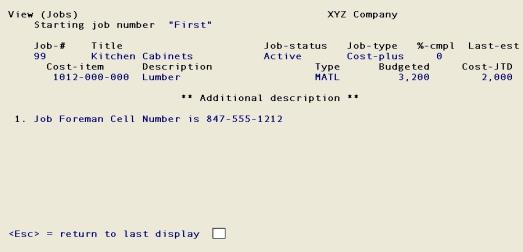
The only option at this point is to press <Esc> to return to the previous screen.
Jobs: Sub-jobs and change orders
If sub-jobs and/or change orders are applicable, you will be able to look at them here. Otherwise, this selection does not appear.
Select
Sub-jobs and change orders from the second Jobs screen.
The following screen displays:
Options
Up to 12 sub-jobs and/or change orders are displayed. You can use one of the options:
|
<F1> |
For the next 12 sub-jobs and/or change orders, if present |
|
<F2> |
To display additional description for any of the sub-jobs or change orders shown |
|
Format |
[Only option key input is accepted here.] |
|
Example |
Press <F2> |
Line number
This field only displays if you have pressed <F2>.
Enter the line number corresponding to the desired item. This is the number that displays on the screen to the left of the desired sub-job or change order.
|
Format |
99 |
|
Example |
Type 3 |
If the entry possesses additional description, the following screen will appear:
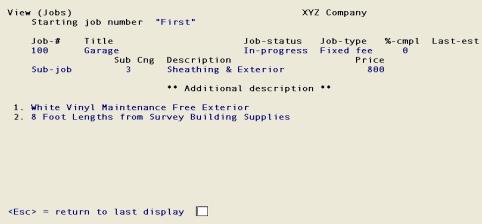
Press <Esc> twice to return to the second Jobs screen.
Jobs: Additional description
Select
Additional description from the second Jobs screen.
If there is any additional description on file for the job, it will be displayed:
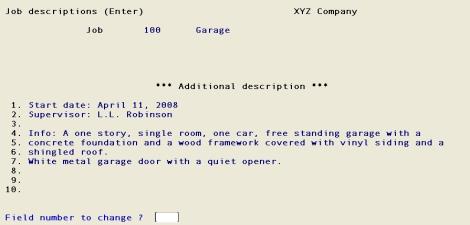
No further options are required for this selection. Press <Esc> to return to the second Jobs screen.
Jobs: Cost and billing summary
Select
Cost and billing summary from the second Jobs screen.
A cost summary for the job displays on the left side of the screen, and a billing and payment summary on the right:
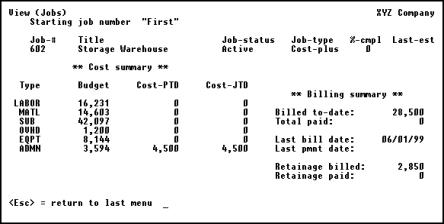
The cost summary shows the budget, period-to-date cost, and year-to-date cost for each cost type that goes into the job.
The billing summary shows the total billings and payments made for the job to date, along with the dates of the last billings and payments posted to the job. Retainage billed and paid (if any) is also shown. This is shown only for entire jobs, not for individual sub-jobs.
No further options are required for this selection. Press <Esc> to return to the second Jobs screen.
Select
Costs by job from the View menu.
This selection lets you look at all costs for a job, so long as these have not been purged or saved. This includes both costs entered via Costing and those imported via Get costs. For more details on purging and saving, refer to the Utility chapter.
This same selection also allows you to view Billing and payment transactions (including debit and credit memos and recognized profit, whether these have been entered manually or imported from other modules). Note that there is no separate Billings by job selection.
The following screen displays:
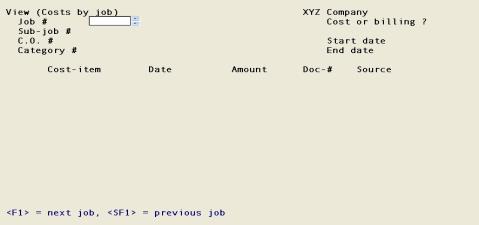
Enter the following information to limit the range of the costs you wish to view:
Job #
Options
Enter the job number whose costs you wish to view, or use one of the options:
|
<F1> |
For the next job on file |
|
Format |
7 characters |
|
Example |
Type 602 |
Sub-job #
If this job does not use sub-jobs, this field displays as Not applicable and cannot be entered.
If the job uses sub-jobs and bills for them, a valid sub-job number is required.
If the job uses sub-jobs but does not bill them:
| • | To view costs, enter a valid sub-job number. The Cost or billing ? field will automatically be set to C and the cursor will bypass it. |
| • | To view billings/payments, leave this field blank. The Cost or billing ? field will automatically be set to B and the cursor will bypass it. |
|
Format |
999 |
|
Example |
Press <Enter> |
Change # (CO)
If you did not choose (in Control information) to use change orders, this field displays as Not applicable and cannot be entered.
Otherwise, enter the number of the change order for the costs you wish to view
If the costs you want to view are not for a change order, leave this field blank.
|
Format |
999 |
|
Example |
Press <Enter>, leaving this field blank |
Category #
Cost items are displayed in category sequence. You can begin viewing at any desired category. Once all cost items for the requested category have been displayed, the remaining cost items will continue to display. The display does not cross job boundaries; however, it terminates at the end of the specified job and, where applicable, sub-job and change order.
Options
Enter the cost category number at which you wish to begin viewing, or use the option:
|
Blank |
To start from the first cost item, or to view billing/payments instead of cost items |
|
Format |
9999999 |
|
Example |
Press <Enter>, leaving this field blank |
Cost or billing ?
If you specified a non-blank category in the previous field, this field is automatically set to C.
If the job uses sub-jobs but does not bill for them separately, this field is automatically set to either C or B, depending on whether or not you have entered a sub-job number.
In both these cases the cursor does not move to this field and you cannot change it.
Otherwise, the field is set to C, but this is merely a default, which you can change. Enter C if you want to look at costs, or B if you want to look at billings and payments (including recognized profit and debit and credit memos).
|
Format |
One letter, either C or B. The default is C. |
|
Example |
Press <Enter> for Cost. |
Start date and End date
Enter the range of dates for the entries you wish to view. Follow the screen instructions.
|
Format |
MMDDYY at each field |
|
Example |
Press <F2> at each field for First through Last |
Up to 13 entries will be displayed, starting with the first one that matches the selections you have entered:
Options
Use the option:
|
<F1> |
For the next 13 entries on file, if any |
|
Format |
Only option key input is accepted for this screen.] |
|
Example |
Press <Esc> to return to the Cost by Job menu, then repeat your entries for the same sub-job, entering B instead of C for Cost or billing? |
The following screen appears:

Options
Use the option:
|
<F1> |
For the next 13 entries on file, if any |
|
Format |
[Only option key input is accepted for this screen.] |
|
Example |
Press <Esc> twice to return to the View menu. |
This selection lets you look at all entries that have been entered for a specific vendor, employee, or customer, regardless of what jobs they are for. The entries shown can be for several jobs, but they will always be for a single vendor, employee, or customer.
Select
Costs by vend/emp/cust from the View menu.
The following screen displays:
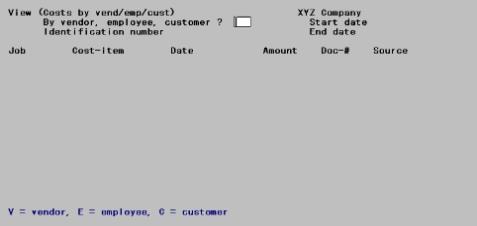
Enter the following information:
By vendor, employee, customer ?
Options
Enter one of the following:
|
V |
Vendor |
|
E |
Employee |
|
C |
Customer |
|
Format |
One letter from the list above. There is no default. |
|
Example |
Type V |
Identification number
Enter the vendor number, employee number, or customer number for the entries you wish to view.
You do not have to be interfaced to the Passport Business Solutions A/P, PR, or A/R modules (respectively) in order to view this information. Be aware however that the information accessed by pressing <F9> is the information on file in Vendors, Employees, and Customers respectively. This is available only if the corresponding Passport Business Solutions module is installed in the same top-level directory as J/C (whether or not J/C Control information specifies that J/C is interfaced to that module). It is therefore not a good idea to assign different vendor numbers in J/C than you do in A/P, and the same holds true for employee numbers and customer numbers.
|
Format |
6 characters (for vendors) 6 digits for employees 12 characters (for customers) |
|
Example |
Type 100 |
Start date and End date
Enter the range of dates for the entries you wish to view. Follow the screen instructions.
|
Format |
MMDDYY at each field |
|
Example |
Press <F2> at each field for First through Last. |
The following screen displays:
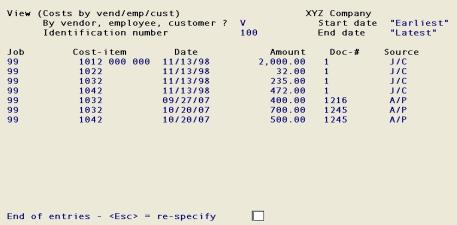
For an employee or vendor, costs will be displayed.
Up to 13 entries will be displayed in date order for the date range you selected.
Options
You can use the option:
|
<F1> |
For the next 13 entries for the same vendor, employee, or customer |
|
Format |
[Only option key input is accepted for this screen.] |
|
Example |
Press <Esc> to return to the Costs by vend/emp/cust menu. Type C (for customer). Then type 100. Press <F2> twice |
The following screen displays:
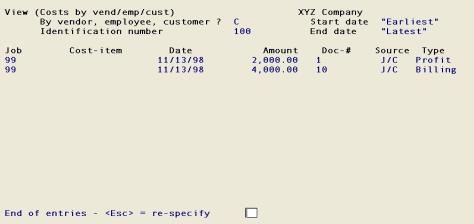
For a customer, billings and payments will be displayed.
Up to 13 entries will be displayed in date order for the date range you selected.
Options
You can use the option:
|
<F1> |
For the next 13 entries for the same customer |
|
Format |
[Only option key input is accepted for this screen.] |
|
Example |
Press <Esc> twice to return to the View menu. |
Here, you can have a rapid look at the cost categories in Cost Categories.
This selection is available even if you have answered N to the question 11. Use cost category file ? in Control information.
Select
Cost categories from the View menu.
Enter the following information:
Enter starting category
Options
Enter the number of the first category of the range you wish to view, or use the option:
|
<F2> |
For the first 15 cost categories on file |
|
Format |
9999999 |
|
Example |
Press <F2> |
The following screen displays:
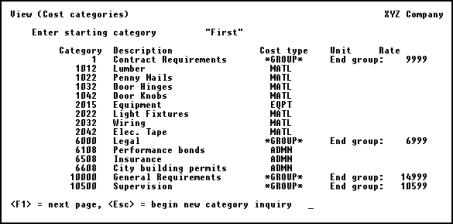
Options
Use the following option:
|
<F1> |
For the next 15 cost categories on file |
|
Format |
[Only option key input is accepted for this screen.] |
|
Example |
Press <Esc> to return to the View menu. |
Here, you can have a rapid look at the valid G/L accounts on file.
Select
G/L accounts from the View menu.
Enter the following information:
Enter starting account number
Options
Enter the number of the first account of the range you wish to view, or use the option:
|
<F2> |
For the first 15 accounts on file |
|
Format |
Your standard account number format, as defined in Company Information |
|
Example |
Press <F2> |
The following screen displays:
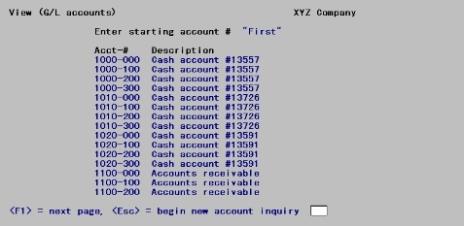
Options
Fifteen accounts will be displayed. Use the option:
|
<F1> |
For the next 15 accounts on file, if present |
|
Format |
[Only option key input is accepted for this screen.] |
|
Example |
Press <Esc> to return to the View menu. |